How do I give a new person access?
There are three ways to let someone in, and in all three you choose **which role they sign in with at the same moment you give them access. Everything is done from the Users** screen. This page explains which one to use in each case, how to deactivate someone who leaves, and what each role means.
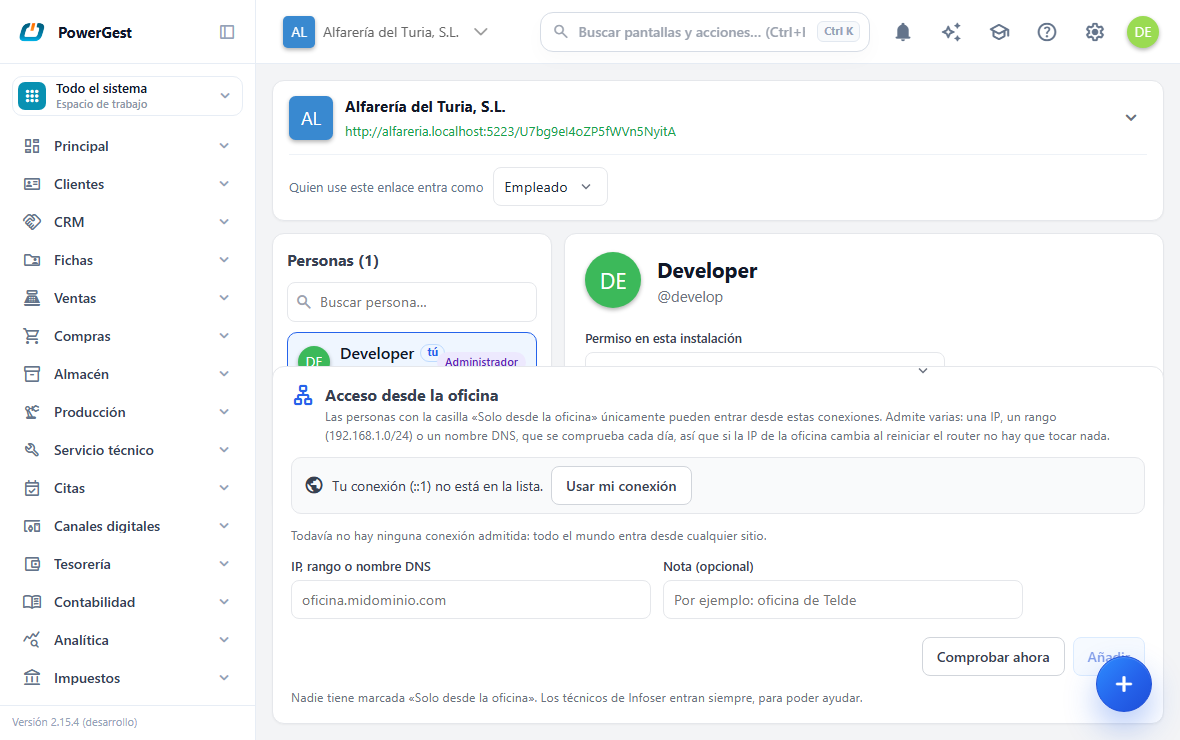
Where do I give a person access?
Go to Settings → Company and users → Users in the side menu. The screen is titled Users and lists everyone who can sign in to this installation.
Each person appears with their name, their username and a label with their current permission.
To give access and to change permissions you need the user management permission. Without it you can see the screen, but read-only: the Add employee and Invite with a role buttons don’t appear, the Permission in this installation drop-down is greyed out with the message ‘Only someone with user management permission can change this.’, and the Deactivate user block isn’t shown.
Which of the three ways of giving access suits me?
All three let the person in with the role you choose. What changes is who does the work and whether the other person has to do anything.
| Way | When to use it | What the other person has to do |
|---|---|---|
| Add employee | You are bringing in someone from your company and want them to be able to sign in now | Sign in with the email address and password you give them |
| Invite with a role | It is someone from outside —an accountancy firm, a collaborator— or you would rather they create their own account | Open the link and join |
| The company’s shared link | You are going to give the same access to several people at once | Open the link and join |
How do I add an employee?
Click Add employee, to the right of the People heading, above the list. A form opens with these fields:
- Type the Email. It is required and is also their identifier for signing in.
- Fill in Name and Surname if you know them. They are optional.
- Choose the Role. They will sign in with that permission from the very first moment.
- Type a Password or leave it empty so the program generates a temporary one.
- Click Create employee.
If you left the password empty, when you finish the Temporary password box appears with the generated password and a Copy button. Copy it at that moment: it isn’t shown again. Give it to the person so they can sign in and change it.
If that email address already had an account in the installation, no new account is created: the one that already existed is added to the company, and there is no password to hand over.
What does the label next to the email mean?
It says whether that person’s email really arrives. Password recovery, notices and documents reach them that way, and nobody finds out an email was mistyped until it is needed.
| Label | What it means |
|---|---|
| Pending | They were sent an email to confirm their address and haven’t opened it yet |
| Validated | They opened the link in that email, or came in through an invitation sent to that address |
| Wrong | The mail server says that mailbox doesn’t receive. Hover over the label to see the reason |
When you add someone with I’ll create the account now, the confirmation email is sent automatically. With I’ll send an invitation by email it isn’t needed: accepting it already confirms the address.
If it says Pending or Wrong, Resend confirmation is next to it: it sends another email with a new link (the previous one stops working). With Wrong, first fix what failed: the mistyped email, the full mailbox or their company’s spam filter.
How do I invite someone from outside with their own role?
Click Invite with a role. This issues a link that carries the permission whoever accepts it will sign in with, so you can give an accountancy firm access without it seeing more than it should.
- Choose the Role. Whoever accepts the invitation will sign in with that permission.
- In Who it is for, type a note that helps you recognise it, such as ‘Pérez accountants’.
- If you fill in Email it is addressed to, only that address can accept it. If you leave it empty, it works for anyone who receives the link.
- In Expires after (days) you enter how many days you want it to be valid. Empty: it doesn’t expire.
- In Maximum uses you enter how many people can accept it. Empty: no limit.
- Click Create invitation and then Copy to take the link with you.
Below is the Active invitations list, with the role and the note of each one. Each line has Copy, to hand out its link again, and Void, which cancels it without affecting the others.
How does the company’s shared link work?
The link box is always visible, at the top of the screen: it shows the company’s logo and name and, below them, the link in green. It is the same for everyone and doesn’t expire over time.
The box’s buttons —Invite with a role, Copy link, Send by email and Reset link— are collapsed when you open the screen. To see them, click the arrow on the right of the box or anywhere on the strip with the company name. Click again to collapse them.
- Click Copy link to copy it to the clipboard, or Send by email to open a message with the link in it.
- Below, in Whoever uses this link signs in as, choose the role it grants. By default it is Employee.
- Whoever opens the link sees a screen with the company’s logo and name and a Join the company button. Nobody gets in just by opening the link: first they see where they are being invited.
- When they click Join the company they go straight into that company, even if they already worked in another one. If they haven’t signed in yet, they are asked for their account and come back to this same screen to confirm.
If it has been shared too widely, click Reset link and confirm in the message that appears. A new one is generated and the old one stops working. Anyone who already joined with the old one keeps their access.
This link can only grant one of the three built-in roles. To give access with one of your company’s own roles, use Invite with a role.
Opening the link twice doesn’t cause an error. It is normal: you click it, the program asks you to sign in, you come back, and along the way the page is reloaded or opened in another tab. Anyone who is already in the company simply gets in; nothing is duplicated and no access is lost.
What if the person already uses Powergest in another company?
They accept the invitation with the account they already have: the same email and the same password. From then on they sign in to your company at your address (your company’s in Powergest) and to theirs at theirs, with a single account. If you deactivate them one day, they can no longer sign in to yours; theirs stays the same.
If it doesn’t recognise their account when accepting, their other company works on another Powergest server: they should register from that same screen, with their email, and accept afterwards.
What does each role mean?
These are the three built-in roles, the ones every new company comes with:
| Role | What it means |
|---|---|
| Administrator | Full access, including user management |
| Employee | Day-to-day work, with no administration tasks |
| Guest | View only, very limited |
Besides those three, the role lists show the roles your company has defined for itself, such as Warehouse or Sales only. They are created on the roles screen, explained in create a role.
How do I change their permission from here?
Choose the person in the list and open Permission in this installation. The list includes the three built-in roles and also your company’s own roles.
The change is saved straight away and the message ‘Permission updated’ appears. The person affected notices it the next time they sign in to the program, not before.
Where do I see a person’s email, and can it be changed?
Choose the person in the list: their email appears in the header of their record, under the name. The list’s search box also finds people by their email.
The email is what the person signs in with, so Powergest support changes it, just as they would change their password. If someone changes address, or was added with a wrong one, send support the new address. When it is changed:
- They sign in with the new email and the same password. Their username does not change.
- If they had the program open, they have to sign in again.
- A notice is sent to the old address and another to the new one.
How do I make someone able to sign in only from the office?
There are two steps, both in Configuración → Empresa y usuarios, Usuarios tab, and only whoever manages users sees them:
- Say where people can sign in from. At the very bottom is the Access from the office box. Type each connection you allow in IP, range or DNS name and click Add. You can add several:
- an IP, such as
81.45.12.10; - a range, such as
192.168.1.0/24; - a DNS name, such as
office.mydomain.com. This is the recommended option: an office IP usually changes when the router restarts, and the name follows it. It also works for someone working from home with their own DNS name.
- an IP, such as
At the top of the box you can see the IP you are connected from and whether it is allowed. If it is not and you are at the office, click Use my connection and then Add.
- Tick the person. Choose them in the list and tick Office only on their record.
From then on, that person can only sign in from the connections on the list. If they try from anywhere else, the sign-in screen tells them they can only sign in from the office and which IP they are trying from, so it can be added if it is the right one. If they already had a session open and leave the office, the session is closed as soon as they use the program again.
Everyone else signs in from wherever they like, as always. Infoser technicians can always sign in, so they can help you.
What happens if the office IP changes?
If you added a DNS name, nothing: it is checked every day and, if someone tries to sign in from an IP that does not match, it is checked again there and then. Check now shows which IP each name gives today.
If you added an IP, you have to add the new one. That is why a DNS name is better.
What the program does not let you do
- Tick someone while there is no connection on the list: they could not sign in from anywhere.
- Tick yourself if you are not on an allowed connection: you would be locked out.
- Remove the connection that would lock you out, or the last one while someone is ticked.
How do I deactivate someone who is leaving the company?
Choose the person and find the Deactivate user block at the end of their record. Click Deactivate user, type the reason if you want to keep a note of it —it is optional— and confirm with Yes, deactivate.
From that moment that person:
- Can no longer sign in to the company. If they have a session open, the company disappears from their selector.
- Is no longer offered when assigning new work: tasks, owner of a contact, worker on a report.
- Doesn’t count in the number of people in the team.
What they did while they were there stays under their name. Reports, the log entries they wrote, the documents they uploaded and the appointments in their calendar still name them. That is why their record isn’t deleted: if it were, months of work would show as belonging to nobody.
What if I made a mistake, or they come back?
You reinstate them, and it is the same operation in both cases. Tick the View those who have left box at the top of the list, choose the person and click Reinstate. Their record comes back with the same permission and their original start date.
It also works the other way round: if you add them again with Add employee and the same email address, the program recognises they were here before and brings them back instead of creating a new record.
What the program doesn’t allow
There are two cases, and both are deliberate:
- You can’t deactivate yourself from this screen. The block says so instead of showing the button.
- You can’t deactivate the only administrator of the installation. The message ‘You cannot remove the only administrator of the installation.’ appears. Deactivated people don’t count for this: if the only active administrator left is you, you aren’t allowed to leave even if there are former administrators in the list.
For the same reason, you also can’t move the last remaining Administrator down to another role. The message ‘There must be at least one administrator left in the installation.’ appears.
Deactivating isn’t deleting the account
They are different things, and this screen only does the first:
| Deactivate | Delete the account | |
|---|---|---|
| Scope | This company | The whole program |
| Their email address | Still taken | Becomes free |
| Can it be undone? | Yes | No |
| Who does it | You, from here | Powergest support |
If someone asks for their data to be deleted, deactivating them isn’t enough: their account has to be deleted, and support does that.
If something goes wrong
| What you see | What has happened | What to do |
|---|---|---|
| ‘Open a company first to manage its users.’ | There is no active company in your session | Choose a company at the top and open the screen again |
| You can’t see any button under the link | The box is collapsed | Click the arrow on the link box |
| Add employee doesn’t appear above the list, nor Invite with a role with the box expanded | Your role doesn’t have user management | Ask an administrator for it |
| ‘That address already belongs to the company.’ | That person already has access | Find them in the list and change their permission if necessary |
| ‘The invitation token isn’t valid.’ | The link was reset after it was handed out | Hand out the current link from the Users screen |
| ‘This invitation has expired.’ | The days of validity you gave it have passed | Issue another invitation with Invite with a role |
| ‘This invitation has been revoked.’ | Someone clicked Void on that invitation | Issue another one |
| ‘This invitation has already been used.’ | Its maximum uses have run out | Issue another one, with more uses or no limit |
| ‘This invitation is for a different email address.’ | The invitation was issued for a specific email address | Ask them to sign in with that email address, or issue one without an email address |
| You lost the temporary password | It is shown only once | Ask them to reset it from the sign-in screen |
| ‘There must be at least one administrator left in the installation.’ | It is the last person with that permission | Make someone else an administrator first |
| The invited person doesn’t appear | They haven’t opened the link or signed in with their account yet | Wait for them to sign in and refresh the list |
| You change their role and they still see the same as before | Permissions are read when they sign in | Ask them to sign out and sign in again |
| A person doesn’t appear in the list | They were deactivated | Tick View those who have left to see them and reinstate them |
| ‘That person was already inactive in the company.’ | They were deactivated twice, perhaps from two tabs | Nothing: it was already done |
| Someone who has left appears in an old report | That is correct: the work keeps the name of the person who did it | Nothing |
Next: Change a person’s permissions · Create a role