How do I collect an instalment?
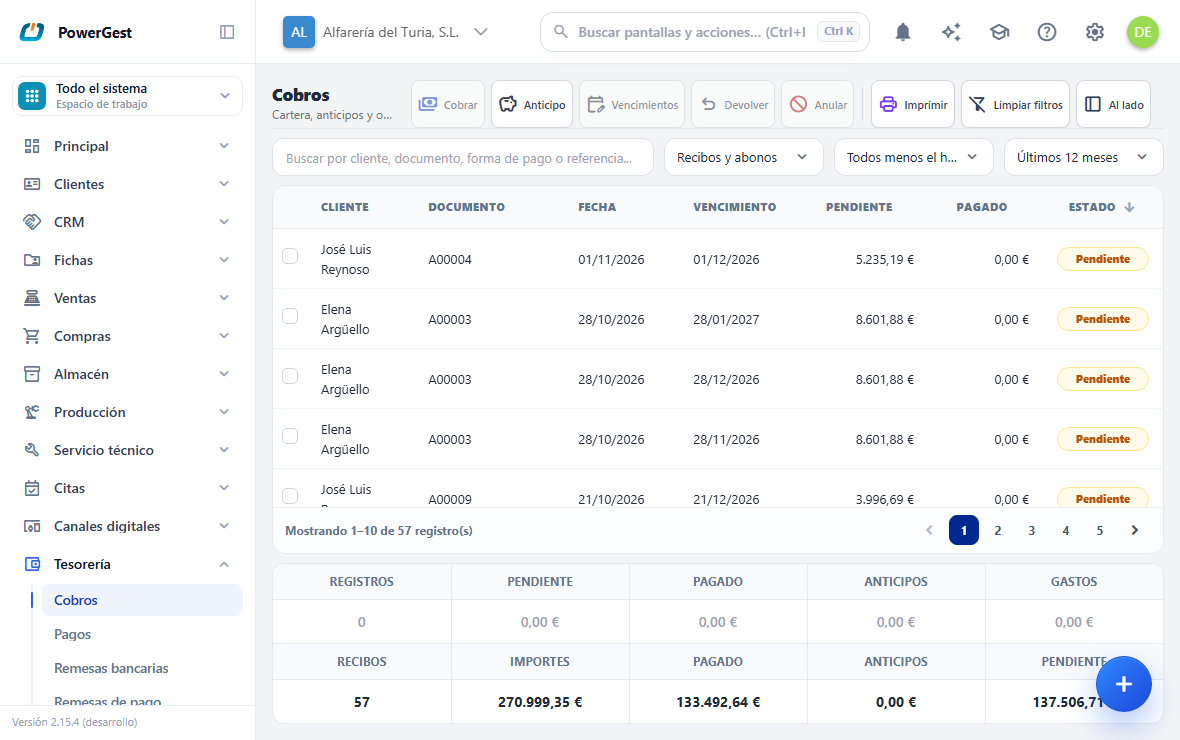
When you issue an invoice in instalments, the ERP creates an instalment for each period. The set of uncollected instalments is the open items. Collecting means recording a receipt batch that settles one or more instalments and enters the money in a treasury account.
What do I need before I start?
You need the customer with outstanding instalments in the open items. Instalments are created on their own when the invoice is issued, according to the customer’s payment method.
You also need at least one active treasury account: the cash or the bank where the money goes in. If you don’t see any in the list, ask whoever administers the ERP for one.
If the invoice was for immediate payment, there is nothing to do: it was collected when it was issued.
How do I do it?
- Go to Receipts and banks and click Receipts.
- Mark in the table the bills you want to collect. They can be from several customers at once.
- Click Collect. The receipt panel opens on the right and the table stays in view, next to it.
- Check the Amount. It opens with the total of what you marked and you can lower it.
- If the customer has advance payments with a balance, Advance payment says how much of this receipt comes out of that balance. It comes filled in with what it can cover and you can lower it (see below).
- Choose the Payment method the customer is paying you with. It suggests its account.
- Check the Bank where the money goes in.
- Document comes with the number of the bill’s invoice. If you want, change it for the number of the cheque, of the transfer or a control code.
- If there are any, type the Expenses.
- Click Collect, at the bottom of the panel.
When you finish, the panel shows at the top, in green, the batch that was recorded: its number, how many bills and the amount. The table updates on its own and the panel stays open for the next receipt: mark the bills and click Collect again. It closes with its cross or with Close.
Can I see the invoice while I collect?
Yes. The receipt panel opens next to the table, without darkening or covering it: the table narrows to make room for it. You see the invoice number, the due date and the outstanding amount of the bills you are collecting.
With the panel open the table can still be used: you can scroll the list, search, filter and mark or unmark bills. Each change to what is marked reaches the panel straight away:
- The Amount and the Advance payment are worked out again with what is now marked.
- Document changes to the numbers of the marked invoices, unless you have typed something in it yourself.
- The Date, the Expenses and the Bank or Payment method you chose stay as you left them.
While the panel is open, Advance payment, Due dates, Return and Void are switched off: what is marked belongs to the receipt. Close the panel to use them.
If the panel covers something you want to see, drag its left edge to make it narrower. A double click on the edge takes it back to its normal width. On a phone the panel takes the whole screen.
How do I collect several batches in a row?
Without closing the panel. After you click Collect, the recorded batch stays at the top in green and the panel gets ready for the next one:
- It keeps the Date, the Payment method and the Bank of the previous one.
- It empties the Amount, the Expenses and the Document.
Mark the bills for the next receipt: the green notice disappears and the panel fills in with them. To see the bills of the batch you have just recorded, click View batch in the green notice.
What does each row of the receipts table mean?
The table shows the customer’s whole situation in a single list, sorted by Status: at the top what is outstanding, then what is paid and at the end the history and the advance payments. You can re-sort it by any column by clicking its header.
For each collected receipt, Payment date says when it was collected and Bank where the money came in (the cash desk or the bank of the operation). Amount is what the receipt was worth and Outstanding what is left. Receipt and Remittance give the receipt number and the operation that settled it. On narrow screens these columns are the first to hide. Below the selection, the footer shows the totals of the whole list: receipts, amounts, paid, advance payments and outstanding.
On the customer’s or supplier’s record, the Collections or Payments tab fills the screen: when you scroll down the list only the table moves, and the Collect or Pay bar, Print and the filters stay at the top, in view.
How do I see the bills of a batch?
Select one bill that is in a batch and click View batch in the bar. You can also click the number in the Direct debit batch column. The table keeps all the bills in that batch, for every customer, whatever their date.
Above the table, next to the filters, a tag with the batch number appears. The Dates filter is switched off while it is set, because the batch already gives the dates. The search, the statuses and Bills and credit notes still work on its bills.
To go back to the usual portfolio, click the cross on the tag, click View batch again (it now says Remove batch) or Clear filters. This filter is not remembered when you leave the screen.
On a customer’s record you only see their bills in that batch. The whole batch, with every customer’s bills, is printed from Print.
The Status column has a coloured badge that tells you at a glance what each row is:
| Status | Colour | What it is |
|---|---|---|
| Outstanding | 🟠 orange | An instalment the customer still owes |
| Overdue | 🔴 red | An instalment that is owed and is already past its date. It only appears if the company has Distinguish overdue items switched on |
| Paid | 🟢 green | An instalment already settled |
| Advance payment | 🟢 teal, with the row shaded | Money the customer handed over on account and still has available |
| History | 🔵 blue | A money movement of a returned bill: that of the receipt and that of its return. It only appears if you mark it in the status filter |
A partly collected bill is a single row. It says Outstanding while there is something left to collect, with what is missing in Outstanding and what has already been collected in Paid. When it has been fully collected it changes to Paid, and it is still a single row even if it was collected in several goes.
An overdue bill still says Outstanding. Even if its date has passed, it is what it is: money that is owed, as in the desktop ERP. To see only the ones whose date has passed, use the Overdue date filter.
If you prefer to see them separately, switch on the Distinguish overdue items tick box in Settings, in the Transfer section. It applies to the whole company. With it on, a bill whose date has passed says Overdue, and its badge and its Due date are shown in red.
The columns mean the same for every row:
- Date: the day the operation was made. On a bill, the date of its invoice; on an advance payment, that of the handover; on a blue row, that of the money movement. A bill that doesn’t come from any invoice —a balance brought over from another financial year— leaves it empty.
- Due date: when it has to be collected. A blue row shows that of the bill it is a trace of, which is the same one you see on its live row: the three lines of a return refer to the same bill and show the same date. It is empty on advance payments that weren’t given an expected date. With Distinguish overdue items on, the date of an overdue bill is shown in red. That red only applies to what is owed: a blue row with a past date isn’t overdue debt.
- Outstanding: what is left to collect on that bill. A bill already fully collected says 0,00, and what was collected is read in Paid. On an advance payment it is empty, because an advance payment isn’t a debt.
- Paid: what has already been settled. On an advance payment, what was handed over when it was recorded.
- Advance payment: the part paid with a balance on account. On an advance payment row, what is left to apply.
- Expenses: those of the operation that recorded that receipt. If one operation settled several bills, the same expenses appear on all its rows, but the footer total counts them only once.
Can I do this from the customer record?
Yes, and it is exactly the same. The Receipts tab of a customer’s record is this same screen limited to them: the same filters, the same actions and the same footer summary. Everything in this document applies there too.
Only two things change, and for the same reason —the customer is already known—: there is no customer column, and an Advance payment recorded from there is created with them already set.
How do I mark several records?
With the checkboxes on the left: each one marks or unmarks its row, and what you mark is added up. The footer summary and the header buttons always act on that: with nothing marked, the footer says 0 records and 0,00 €, even if the table has rows. Its Outstanding column adds up that of the table.
Clicking on the row —outside the checkbox— selects only that one and releases whatever you had marked before. That way you can go through the table looking at records without dragging along a selection you didn’t ask for.
How do I choose which statuses I see?
With the statuses drop-down, which has one checkbox per status: mark the ones you want to see and the table keeps only those. You can mark several at once —Outstanding and Paid to go over a bill from start to finish, or Advance payment and History to see only what isn’t live debt—.
- All except history is how the screen starts and is what you see while you don’t mark anything: outstanding, paid and advance payments. Marking it releases whatever you had marked.
- The blue History rows only appear if you mark History. To see absolutely everything, mark all four.
- The button says what you are seeing: the name of the status if it is one, both names if there are two, and ‘3 statuses’ from there on. The full name of all of them is in its tooltip when you hover over it.
- The panel stays open while you mark, so you can choose several in one go. It closes when you click outside it, with Esc or by clicking the button again.
Outstanding also brings the overdue bills: they are outstanding, even if the company labels them Overdue. To keep only those, there is the date filter.
Clear filters goes back to All except history.
How do I choose the period I am looking at?
With the Dates drop-down, above the table. There is only one and its four options are mutually exclusive: the one you choose is the table’s whole date criterion; they aren’t added together.
| Option | What it shows |
|---|---|
| Last 12 months | What the screen starts with: the last year. |
| Overdue | Only the outstanding bills whose date has already passed, with no age limit: debt from years ago too. They are labelled Outstanding, or Overdue if the company distinguishes overdue items. |
| Next 30 days | Only the outstanding bills that fall due from today up to a month from now. |
| All dates | Everything, with no date cut-off. |
Overdue and Next 30 days ask about a due date, so they leave out advance payments and the blue history rows: neither an advance payment nor a movement that has already happened falls due.
Clear filters returns the drop-down to Last 12 months.
Does the screen remember the filters I left set?
Yes. When you leave and come back, Receipts opens as you left it: the same search text, the same statuses marked and the same period. That way you don’t have to redo the same filtering every morning.
- They are remembered in this browser and on this computer. From another workstation —or another browser— the screen starts with its usual values. Clearing the browsing data also forgets them.
- Receipts and Payments each remember their own: they are two screens, and what you were looking at in one says nothing about the other.
- The Receipts tab of a customer’s record shares the filters with the full screen: it is the same screen limited to them.
- Clear filters forgets them as well as removing them, so next time the screen opens again as if freshly installed: no text, All except history and Last 12 months.
Do I see the receipts of all my companies?
No. Receipts shows the open items of the active company, the one that appears in the selector in the top bar. The bills, advance payments and batches of your other companies don’t appear here, and aren’t added into the footer totals.
It is the same as with customers or items: each company has its own. The same customer can owe money to two of your companies, and each one is collected from its own company.
If something seems to be missing, first check which company you have active. Changing company in the selector redraws the screen with the open items of that other company; nothing has been deleted.
This applies equally to Payments, to the Receipts tab of a customer’s record and to direct debit batches.
What are the blue history rows?
The trace of a return: the two money movements of a returned bill, that of the receipt as a positive amount and that of the return as a negative one, each with its date and its amount.
They don’t appear unless you ask for them. Mark History in the status filter to see them. Without them, the returned bill is shown as what it is today: an Outstanding bill again, and the return can also be undone from that row.
Only returned bills have them. An ordinary receipt doesn’t leave any: its own row already says it has been collected.
They are marked like any other row, and from one of them you click Void to undo the return: the bill goes back from Outstanding to Paid and both entries disappear, even if you had only marked one — they are the trace of the same return and go with it.
What is the payment method for when collecting?
So that you don’t have to remember which account each receipt goes to. The Payment method field of the receipt says how the customer is paying you, and when you choose it the ERP suggests its treasury account: the card one if it has one, and otherwise the bank one.
It is a suggestion, not an imposition. You can change the Bank after choosing the method: what you leave in that field is what counts.
If you choose a method that has no account set, the account that was already there isn’t cleared: that method doesn’t say ‘nowhere’, it says ‘I don’t know’.
And if you don’t choose a payment method, the field starts with your usual account, the same one the full form uses.
Which account each method has is set up in Treasury → Payment methods (see set the payment terms).
What is the Document field for when collecting?
To record what is being collected or which payment you received. The Document field is in the receipt panel, below the Bank, and it is free text: you type whatever you want, up to 60 characters. It is optional.
It comes filled in with the number of the invoice of the bill you are collecting. If you collect bills from several invoices, it brings their numbers separated by commas, if they fit in the 60 characters; if they don’t fit, it comes empty. A bill that doesn’t come from any invoice —a balance brought over from another year— adds no number.
You can change it for the number of the cheque, of the transfer or a control code. What you type stays even if you change the marked bills.
What you type is saved with the batch and appears in the Journal, in the Invoice column of that receipt’s journal entry. It is the same column where the journal entry of an invoice shows its number. That way, when you go over the journal, each receipt says which cheque or which transfer it was.
It isn’t the payment method: Payment method is still a drop-down and says how you are paid. Document says which of those payments it was. When recording a payment to a supplier the field is the same and works the same way.
Can I set the treasury account I always use?
Yes. It is a preference of yours, not of the company: each person sets their own. Whoever collects at the counter and whoever pays suppliers don’t have to use the same cash or the same bank.
It is set in My settings → Preferences, Receipts and payments section, field My usual treasury account. Choose the account and click Save.
From that moment the receipts and payments form starts with that account already set. You can change it on any particular receipt: the preference only fills in the field when it is empty and never overwrites what you have chosen.
The assistant uses that same account when you ask it for a receipt or a payment without saying which account. You can also set it by talking to it: ‘always collect through Santander’ leaves you a confirmation card, and the preference is saved when you click Confirm, not just because you said it.
To remove it, choose No preference.
If the account you set is closed, the preference stops applying on its own. You don’t need to touch anything, and the money isn’t entered in an account that is no longer in use.
Why does the receipt already have a bank and a payment method?
Because the ERP suggests the right ones, as the desktop ERP did. The Collect panel (in Receipts and in the receipts tab of the customer record) starts like this:
- Payment method: the one on the bill you are collecting or, if the bill has none, the one on its invoice.
- Bank, the first one found in this list:
- the bank on the bill or, if it has none, the one on its invoice;
- the one on the payment method, if it has an account set;
- your usual account, if you have one;
- the company’s default bank (Settings → Transfer, Bank account field).
If you collect several bills at once and they don’t carry the same bank or the same payment method, that field isn’t taken from them. It is all a suggestion: you can change both fields before clicking Collect. If you change them yourself, they stay as you left them even if you mark other bills.
The first one almost always wins: an invoice is created with the company’s default bank (or with the cash account, if the default cash payment in Settings → Transfer is cash) and keeps it unless someone changes it on the invoice. The bank you collected with last time is never suggested.
How do I collect only part of an instalment?
Type the amount in the Amount to apply column of that instalment. It must be less than its Outstanding and of the same sign.
The bill stays on a single row, Outstanding, with what is missing in Outstanding and what was collected in Paid. When you collect the rest it changes to Paid, on the same row.
Example: an instalment of 100 € of which you collect 40 € stays on one row with 60 € outstanding and 40 € paid.
Return and Void on that row act on the last receipt: if you void it, that money is outstanding again; if you void all its receipts, the bill is left whole, as it was before collecting it.
What do I do if the customer pays too much?
Tick Overpayment when recording the collection and type in Amount what they actually paid. The marked bills are settled in full. Then, in The overpaid amount is, choose what the surplus is:
- Extraordinary income: it goes to exceptional income (account 778) and is not left in the customer's favour. This is the usual choice when the surplus is small and will not be claimed or refunded.
- Customer advance: it stays on account for the customer (438), like any advance. You will see it in their balance on account and it is applied to their next collection.
Example: a customer owes 195 and pays 198. The 195 bill is collected and 198 goes into the bank. The 3 extra go to 778, or stay as a customer advance. A payment to a supplier works the same way: the overpaid amount goes to exceptional expenses (678) or stays as an advance to supplier (407).
Without the box, an amount larger than what is marked is not accepted. With an overpayment, advances are not applied. If you cancel the collection, the bill is outstanding again and the 3 entry to 778 disappears. If you chose an advance, the advance is a separate transaction: cancel it too if it no longer applies.
Can I change the date or the amount of instalments I haven’t collected yet?
Yes, from this screen. Mark the outstanding bills of one invoice and click Instalments. The list of its instalments opens and in each one you can change the date, the amount and the payment method. Add instalment splits one into several, and the bin joins two: the amount of the one you remove goes to the others.
The instalments must still add up to the same: the top line shows what is left to distribute, and if it does not match nothing is saved. An instalment that is collected, returned or has something applied cannot be changed.
You can also change just the date from the invoice or the simplified invoice it comes from: open the document, click the pencil and change the date in the instalments table on the Financial tab. Step by step in how do I change the date of an instalment.
How do I deduct a credit note in the same receipt?
Mark the credit note together with the instalments on the Instalments and credit notes tab. Credit notes appear with a negative amount and with the word Credit note in the Type column.
The Total to collect goes down by the amount of the credit note. Only the difference is collected in cash. In the Financial summary you see them separately: Instalment amount and Credit note amount.
The credit note is settled just like a normal instalment: it no longer appears in the open items.
How do I apply an advance payment to this receipt?
An advance payment is money the customer has already handed over on account. When it has a balance, the Collect panel shows an Advance payment field: how much of this receipt is paid with that balance.
The field opens with everything the balance can cover and can be lowered: type the amount you want to apply, or leave it at zero to collect it all in cash. More than what is on account isn’t accepted: the field stays at the maximum available.
Only what is needed is applied. If the customer has three advance payments of 100 € and the bill is for 500 €, the field opens with 300 € and you enter the rest in cash. If the bill is for 75 €, it opens with 75 €.
You don’t have to say which of their advance payments the money comes from: they are used from the oldest to the most recent until the amount you typed is reached. The one that runs out stops being offered; the one that is half used keeps what it has left.
If the customer has no balance on account, the field doesn’t appear.
If the bills you marked are from several customers, no advance payments are offered: they belong to a particular customer and can’t be shared among several.
What happens if I collect partly with an advance payment and partly in cash?
The bill stays on a single row, and the Advance payment column says how much of what was collected came from the balance on account.
Example: a bill of 500 €, of which you collect 400 € (300 € from advance payments and 100 € in cash).
| Status | Outstanding | Paid | Advance payment |
|---|---|---|---|
| 🟠 Outstanding | 100,00 € | 400,00 € | 300,00 € |
In the accounts, the part paid with an advance payment goes on its own line of the customer’s account, with the description ‘Advance payment applied’, so that it can be seen in their general ledger.
What happens when I confirm the receipt?
When you confirm, several things happen in one go. If any of them fails, none of them is done: the open items stay as they were and nothing is collected.
This is what happens:
- The receipt batch is created with its final number, consecutive and with no gaps.
- The marked instalments become collected. Those collected in part stay outstanding for what is missing.
- The money goes into the Treasury account, only for the net amount in cash.
- The advance payments and vouchers you applied are used up.
- The receipt’s journal entry is generated and the customer’s debt goes down.
- If the invoice was under the cash accounting scheme, the VAT becomes due at this moment.
Can I look at something else halfway through a receipt?
Yes, on the New receipt screen (and New payment). Go wherever you need —an invoice, the customer’s record— and come back with Back or from the menu: the receipt is as you left it, with the customer, the account, the instalments you had marked and the amounts you had typed. On the way back the open items are read again: if someone collected one of your instalments in the meantime, it no longer appears, and the rest stays as it was.
Until you confirm it, the receipt is not saved. It is lost if you close the browser tab or press Cancel.
The totals you see —advance payments applied, vouchers applied and total to collect— are worked out with the same rule used when you confirm: what you see is what gets posted.
How do I tell credit notes apart in the list?
A credit note appears in the receipts list as one more row, with its amount as a negative, because that is what it is: something you owe the customer and that is deducted from what they owe you.
So that it isn’t mistaken for a bill, the Status column has a Credit note mark underneath. The mark is separate from the status because they are two different things: a credit note can be waiting to be offset or already offset, and both matter.
The Bills and credit notes drop-down, to the left of the statuses one, lets you keep one or the other. It has a checkbox for each:
| What you mark | What you see |
|---|---|
| Neither, or both | Everything, which is how the screen starts |
| Bills | What has to be collected, without the credit notes deducting |
| Credit notes | What you owe the customer, so you can go over it |
It has its own drop-down and isn’t among the statuses so that you can combine them: ‘credit notes that are still outstanding’ are both things at once. Clear filters also returns it to everything.
And the footer stops mixing them. When what you have marked includes a credit note, two more columns appear: Credit notes, with what they add up to, and Net, which is the difference. There used to be a single figure, and with 10.000 € to collect and 3.000 € credited you read 7.000 €, from which you couldn’t tell whether the customer owes little or owes a lot and has a lot in their favour. If there are no credit notes marked, the footer is the usual one.
The same on paper: when printing, the status says (credit note) and the header writes what there is to collect and what has been credited, each one separately.
Can I print the list I am looking at?
Yes, with the Print button. A dialog opens and, when you click Generate PDF, the document appears in the application’s viewer, where you can print it or download it.
In What to print you choose the paper:
| Option | What comes out |
|---|---|
| List of due dates | The list, with the filters below |
| Bills of the N selected | One bill for each selected due date, with the company’s bill layout |
| Whole batch N | All the bills in the batch, for every customer. It appears if you filter by a batch or have selected a bill that is in one |
For the list, the dialog brings the screen’s filters already set: search, statuses, bills and credit notes, dates and the batch if there is one. If you don’t change anything, the rows you have in front of you come out, with the same columns and in the same order. If you change a filter, the list comes out with those, even if they are not the screen’s, and the note below tells you so.
If you have due dates selected, the Only the N selected due dates box prints just those. On a customer’s record it comes switched on when there is any selected.
The page comes out in landscape. There are nine columns, and in portrait the names and dates get cut off (‘Outsta…’, ‘18/09/…’).
At the top, next to the number of records, the filters it comes out with are written (the search, the statuses, the period or the batch), so that the paper says what the list is about. At the end, the totals of amount, collected and outstanding.
If the list is empty it isn’t printed: there is nothing to put on paper.
If something goes wrong
| What you see | What has happened | What to do |
|---|---|---|
| ‘Select a customer’ | The customer is missing on the Details tab | Choose the customer and save again |
| ‘Select the treasury account for the operation’ | The cash or the bank is missing | Choose the Treasury account |
| ‘Select at least one instalment or credit note to collect’ | Nothing is marked | Mark at least one checkbox in Instalments and credit notes |
| ‘The amount to apply to instalment #N exceeds its outstanding amount’ | You have typed more than what is left | Type a smaller amount or leave the field empty |
| ‘Instalment N is not pending’ | Someone else collected it in the meantime | Go back to the list and reload the customer’s open items |
| ‘Voucher N is a Payment voucher and the operation is a Receipt’ | The voucher is a supplier’s, not a customer’s | Remove that voucher from the selection |
| ‘The customer has no outstanding instalments or credit notes to collect’ | Their open items are empty | Check that the invoice is issued and wasn’t for immediate payment |
See also: Record an advance payment · Use a voucher · Return a receipt · Generate a bank batch
More about Payments
- The cash keys
- How do I add a treasury account?
- How do I return a receipt?
- The cash and bank journal
- How do I generate a bank batch?
- Collecting and paying with Powergest
- How do I record a payment to a supplier?
- How do I set the payment terms for a customer or a supplier?
- How do I record an advance payment from a customer?
- What is a voucher and how do I use it?