How do I add an item?
An item is each thing you sell or buy. It can be a product with stock or a service. Its Code is what you will type on document lines.
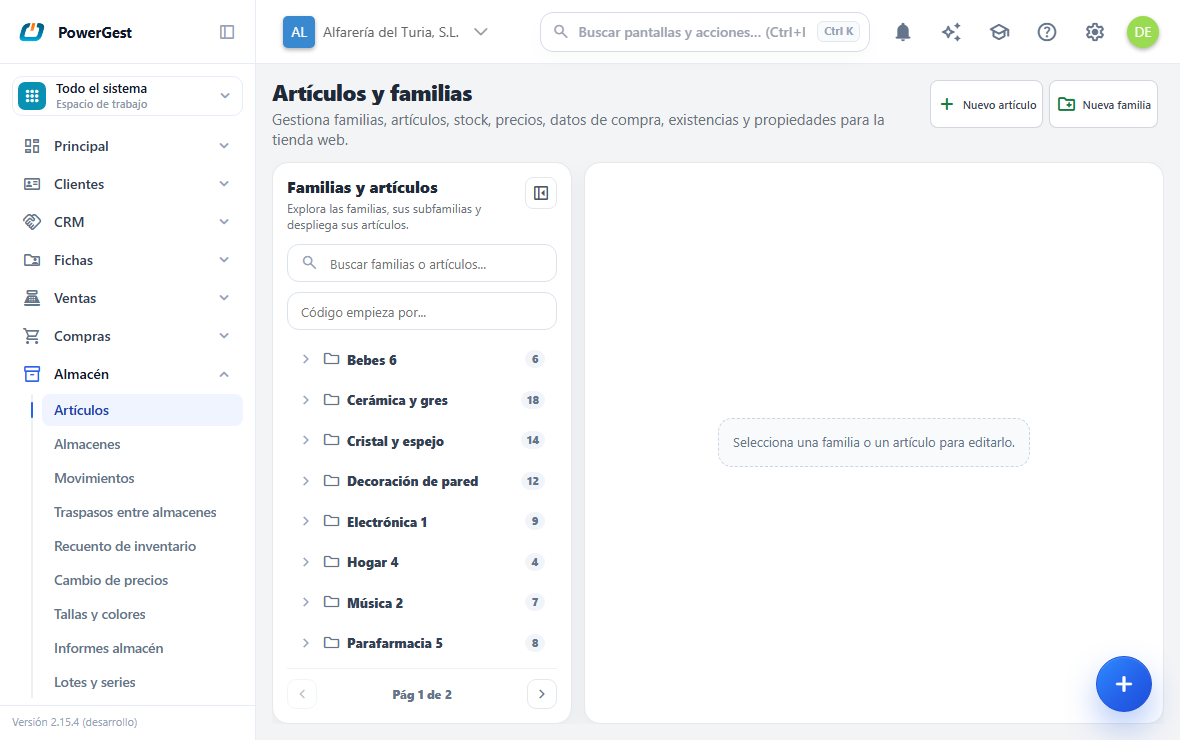
What do I need before I start?
You need the Code, the Name and Sale price 1. They are the three fields that adding an item asks for.
The Family and the Supplier are optional when adding, but it is best to have the item family created beforehand: price list conditions can be aimed at a whole item family, and the tree on the screen groups items by item family.
How do I do it?
- Go to Items and click New item.
- Type the Code. If it starts with a number, it is padded with zeros on the left up to the digits your company has in Settings → Sales and documents → Codes (six by default): typing
1saves000001. If it starts with a letter, it is put into capitals and isn’t padded:art-1savesART-1. With ‘No formatting’ on that screen, the code is saved exactly as you type it. You already see it like that when you leave the field: what stays written is what is saved. - Type the Name.
- Choose the Family and the Supplier if you have them. In both fields you can type the code directly or click the magnifying glass to search.
- Type Sale price 1.
- Click Save.
The item starts ticked as Active item and with Stock control on: it is assumed to be goods. If it is a repair, labour or anything else that doesn’t involve a warehouse, untick it on the General tab of its record.
How do I add one?
With New item, at the top, which opens the record of a new one with the code, the name and the price to fill in. It is born inside the family you have selected in the tree on the left.
How do I create item families and subfamilies?
There are two buttons, and each one suggests a different place:
- New family, at the top of the screen, creates the item family at the same level as the one you have selected in the tree. If the selected one is a main item family, the new one is too; if it is a subfamily of ‘Drinks’, the new one also goes inside ‘Drinks’.
- New subfamily, on an item family’s record, creates the new one inside that item family.
When you create an item family, it stays selected. That is why you can click New family several times in a row: they all stay at the same level, without going inside one another.
The window for adding one says at the top where it will be created: ‘Create new family’ (main) or ‘Create new subfamily’, with the name of the item family that will contain it. If that isn’t what you want, change the Parent family field, or empty it to make it a main item family.
Where are brands created?
An item’s brand is chosen on its record, General tab, Brand field: the magnifying glass opens the Brand search with the existing ones. From there you choose or remove one, but you don’t create a new one.
Brands come into the program when you bring them in: with the migration from the desktop ERP or with Tools → Data import, choosing brands as what you import. There isn’t a screen yet to add a single brand.
What happens when I click Save?
The item is created with its code already normalised and with Sale price 1 in the first price level. It appears in the tree, under its item family.
If the code already exists, adding it is rejected with the warning ‘An item with code 'X' already exists.’ and nothing is created. The check is made on the code once normalised: 1 and 000001 are the same code.
Can I add lots of items in one go?
Yes, by dictating them to the assistant. You paste the list or attach the spreadsheet, it shows you a card with all the records and creates them with one click: up to 50 items per action. Any missing item families are created with them and names that already exist are skipped.
How to ask for it and what details it understands from each row is in add several items at once.
The image and the opening stock don’t go in that process: the image is added here, on the record, and the stock is set afterwards with a stock count.
For a whole catalogue coming from another program, that isn’t the way: it is the import screen.
What is on the item record?
The record opens when you select an item in the tree and has these tabs:
- General: code, name, item family, supplier, brand, reference, barcode, warehouse, location, units per box (the ones an invoice line copies into its Units/box column), catalogue, VAT, traceability and the Stock control, VAT exempt and Active item boxes.
Family, Supplier and Warehouse are filled in by typing their code: when you leave the field, the name appears next to it. If you don’t know the code, F2 or the magnifying glass opens the search; when you close it, you are still in the same field.
The Stock control box says whether that item involves a warehouse. Untick it for anything that isn’t goods —a repair, labour, shipping—: it is invoiced the same way, but it doesn’t reduce stock and its invoice never fails for lack of stock. A new item starts with the box ticked.
- Stock: the stock in the warehouse you choose and its movements.
- Prices: purchase prices, the six sale levels and the item’s ledger accounts. Prices are explained in set prices and price lists.
- Details: the long description and the Text for documents: a text with bold, italics and lists that is copied below the line when the item is added to a sales document. Below it are the Internal tags: words of your own to classify the item (‘Trade fair; Clearance’), separated by semicolons. They change nothing about what the item does: they are for narrowing an items report by them and for adding or removing them in one go on every item in a group or a segment (groups and segments).
- Properties: up to eight descriptive attributes for the catalogue and the online store.
- Sizes: the sizes and colours grid. It is explained in sizes and colours of an item.
The item’s VAT
On General, the VAT field says at which rate that item is sold. When you put it on an invoice, the line takes that rate: an item at 10 % no longer gets invoiced at 21 % by mistake.
- The list comes from your company’s VAT rates, and only the ones in force today are shown.
- If you leave it as Not set, the line keeps the VAT the document has.
- VAT exempt overrides the rate: when you tick it, the rate is cleared and the line starts without VAT.
The Batches and Serial numbers tabs only appear if the corresponding module is active in your company and the item is marked with that traceability.
How do I find an item by its code?
From the record itself, in the Item field on the General tab:
- Press F2 or the field’s magnifying glass: the item search opens with whatever you have typed. When you choose one, you go to its record.
- Or type another item’s code and leave the field: if it exists, you go to its record. The item you were on doesn’t change its code.
In the Item families and items panel on the left there are also two boxes. Search item families or items... searches for part of the name or the code. Below it, Code starts with... only looks at the code and brings up the items whose code starts with what you type; leading zeros don’t matter (125 brings up 000125). The two can be combined, and the tree opens only at the item families where there are results.
Can I work without the item family tree?
Yes. The tree is handy for going through an item family, but it gets in the way if you work with items from several item families or just want to look one up.
- Click the icon in the header of the Item families and items panel to hide it. The item record then takes up the full width.
- At the top of the record you have the previous item and the next item, in code order, as in the Desktop ERP. If you click the item’s name, the search opens so you can jump to any other one.
- To see the item families again, click the icon on the narrow bar on the left.
The screen opens next time the way you left it, on any workstation: your user remembers it.
Which accounts does the item go to in the accounts?
At the end of the Prices tab is the Ledger accounts block, with two fields:
- Purchases account (expense): where this item’s base goes when you buy it.
- Sales account (income): where this item’s base goes when you sell it.
They are for things that aren’t goods for resale: a service sold against 705, a rental against 752, a utilities expense against 628. If you leave them blank, the item goes to the accounts in the accounting settings, normally 600 and 700.
You can type the short account: when you leave the field, 705 is completed with zeros up to the sub-account (70500000) and its name appears next to it. If you don’t know the account, click the magnifying glass or F2 and choose it from the chart of accounts; if the one you type doesn’t exist, that same window opens searching for it. Only an account that can be posted to is accepted: if you type something that isn’t, the save is rejected and you are told why.
In the invoice’s journal entry, each line goes to its item’s account and lines with the same account are combined into a single journal line. So an invoice with a sale of goods and a service ends up with one journal line to 700 and another to 705. Lines without an item go to the account in the settings.
Changing an item’s account doesn’t affect invoices already posted: it applies to the ones you post from then on.
If the item is a fixed asset, its purchase doesn’t go to the purchases account: it goes to the asset account on the Fixed assets tab.
How do I save changes to the record?
While you are changing the record, the Unsaved changes notice appears in the header. Click Save changes to keep them, or Revert to discard them.
Saving isn’t a single operation: the general details, the prices, the properties and the stock are saved separately, one after another. If one fails, the previous ones have already been saved. The notice tells you which one failed.
How do I add an image to an item?
The image is in the record header, to the left of the name, where the icon is. While the item has no image you see the usual icon there.
To add it: hover over it —the add photo icon appears— and click. The file browser opens. Choose an image: it accepts PNG, JPG and the usual formats, up to 5 MB. The image appears in the header and that is it: no window opens on top.
To see it full size, change it or remove it: click the thumbnail. The full-screen viewer opens, with the image zoomable:
- Mouse wheel to zoom in and out, and drag to move around when it is zoomed in. On the image there is a control with the same functions: −, + and Fit, which returns it to its size.
- Change image opens the file browser to choose another one. The new one is shown in place of the previous one, without leaving the viewer.
- Remove image leaves the item without an image and closes the viewer.
- Esc, the ✕ or clicking outside closes the viewer.
The image isn’t saved on its own: until you click Save changes, the record shows the Unsaved changes notice, and Revert puts back the image that was there.
The item family record works the same way.
This image is the one the online store takes: when you add the item to its catalogue, it goes into its image strip and there it is one more —it can be reordered, made the cover and deleted—. It is a copy: deleting it in the store doesn’t affect the record, and changing it on the record doesn’t change the one already in the store. The item’s other images are taken from the Online store screen.
Can I change the code of an item already created?
Yes, from the Item field on the General tab: type the new code and save.
If you type a code that another item already has, it isn’t given to this one: you go to that other item’s record, which is what happens when searching by code. To change the code, choose a free one.
Changing the code of an item that already has sizes and colours doesn’t rebuild the codes of its variants: they will keep the old code until you save its grid again.
How do I go from here to the online store?
In the header of the item record you have the View in the online store link. It takes you to the Online store screen, to its Catalogue tab, and it arrives there already selected: its item family is expanded, it is highlighted in the left-hand panel and the Definition column opens with its record —its gallery and its publishable content—, ready to edit.
The search boxes are left empty on purpose: you get the whole tree, so you can drag anything else without having to clear a filter first.
To the left of the Online store title there is a button with an arrow ←. It takes you back to the item record without searching for it again. If you hover over it, it tells you where it goes back to: ‘Back to the item’.
The link is always there, whether you have a store or not. If your company has no store connected, it is the Online store screen itself that tells you when you get there.
If the item doesn’t appear in the Published catalogue column, it means it isn’t assigned to any store category yet. How to do that is explained in prepare the store catalogue.
How do I delete an item?
Select it and click Delete. The confirmation asks you to confirm the action.
Its stock per warehouse and per batch is deleted with it: it is only the item’s balance and makes no sense without it.
If the item appears on any document or has stock movements, it isn’t deleted and the program tells you why. This is intentional: deleting it would leave documents and movements pointing at an item that no longer exists. In that case, untick its Active item box.
If something goes wrong
| What you see | What has happened | What to do |
|---|---|---|
| ‘An item with code 'X' already exists.’ | The code, once normalised, is already in use | Choose another. Remember that 1 and 000001 are the same code |
| Typing a new code in Item opens another record | Another item already has that code | Go back to the item you were changing and choose a free code |
| The Batches or Serial numbers tab doesn’t appear | The module isn’t active, or the item doesn’t have that traceability | Set the Traceability on General. If the drop-down doesn’t appear, the module is turned off |
| The item doesn’t come up when you type its code on an invoice | The code typed doesn’t match the one saved | Look it up with the magnifying glass. The search also finds by SKU and by barcode |
| The item doesn’t come up when you scan its barcode | The barcode saved on the record has a different form from the one the scanner reads | Open the record and save it again: when saving, the barcode is put into its canonical form (capitals, no spaces or hyphens) and from then on it matches. Records added before September 2026 may have it exactly as it was typed |
| ‘The image exceeds the maximum size of 5 MB’ | The chosen file is larger than allowed | Reduce the image before uploading it. The catalogue doesn’t need more resolution |
| ‘The image could not be loaded’ | The file couldn’t be saved on the server | Try again. If it keeps happening, tell support: it is recorded in the log |
| ‘The item cannot be deleted: it is used in document lines’ or ‘…it has stock movements’ | There are documents or movements that refer to it | Don’t delete it: untick Active item |
| ‘The item cannot be deleted: other data in the program still uses it’ | Another record uses it (a batch, a bill of materials, a price list…) | Don’t delete it: untick Active item |
| ‘Sales account: Account “X” is not valid’ when saving | What you typed isn’t an account that can be posted to: it has letters or doesn’t fit in the sub-account length | Type the account with numbers, short (705) or in full (70500000), or leave it blank |
A service invoice goes to 700 | The item has no Sales account, or the invoice was posted before you set it | Set it on the Prices tab. Invoices already posted keep the account they were posted with |
See also: Set prices and price lists · Sizes and colours of an item
More about Records
- How do I change the length of codes?
- What are trades for?
- What are customer types for?
- How do I classify my customers by type, route, trade and carrier?
- How do I set up my company’s sizes and colours?
- How do I add a sales agent?
- How do I add a customer?
- How do I add a supplier?
- How do I add my customers’ vehicles?
- How do I add a currency?
- Mailing for your customers and suppliers
- The records the whole ERP works with