How do I generate a bank batch?
A bank batch groups the instalments of several customers or suppliers into a single operation and produces a SEPA file for the bank. For receipts the file sets up the direct debits for the bills; for payments it orders the transfers.
What do I need before I start?
You need a treasury account with an IBAN. It is your company’s IBAN that goes in the file. Without it, the generate button isn’t enabled.
To collect by direct debit you also need an active mandate for each customer: the signed authorisation that lets you charge bills to them. The file also carries your company’s SEPA creditor identifier. With almost every bank there is nothing to do: the one the desktop application uses is applied, the one derived from the company’s tax ID with the suffix 001.
What if my bank gives me another SEPA suffix?
In the Preliminary settings tab, field Bank SEPA suffix (or creditor identifier), you can enter any of these three things:
- Nothing: suffix 001 is used.
- The suffix your bank gives you, for example
002. - The whole creditor identifier, if your bank gives it to you that way. It can be pasted with Ctrl+V.
Below the field you see the identifier the file will carry. What you type is saved for the company and also applies to the next batches. If the pasted identifier doesn’t match the tax ID, the screen warns you. It is the same field as in Settings → Sales and documents → Invoicing → SEPA batches.
For payment transfers you need the IBAN on each supplier’s record.
Which bank does the batch suggest?
The bank of the invoices of the bills you select: the one each invoice carries in its Cash/Bank. If you change the selected bills, the suggested bank changes with them.
- If the selected invoices carry different banks, the company’s default bank is suggested (Settings → Transfer). The SEPA generation tab says how many bills are From invoices with another bank: they still go into the batch, through the bank you choose.
- You can always change it by hand, in Preliminary settings or in SEPA generation. What you choose by hand is kept: it no longer changes when you select other bills.
How do I do it?
- Go to Treasury. Click Direct debit batches for receipts or Payment batches for payments.
- On the Preliminary settings tab is the Treasury account, with the bank of the invoices. Change it if you want another one. The screen warns you if it has no IBAN.
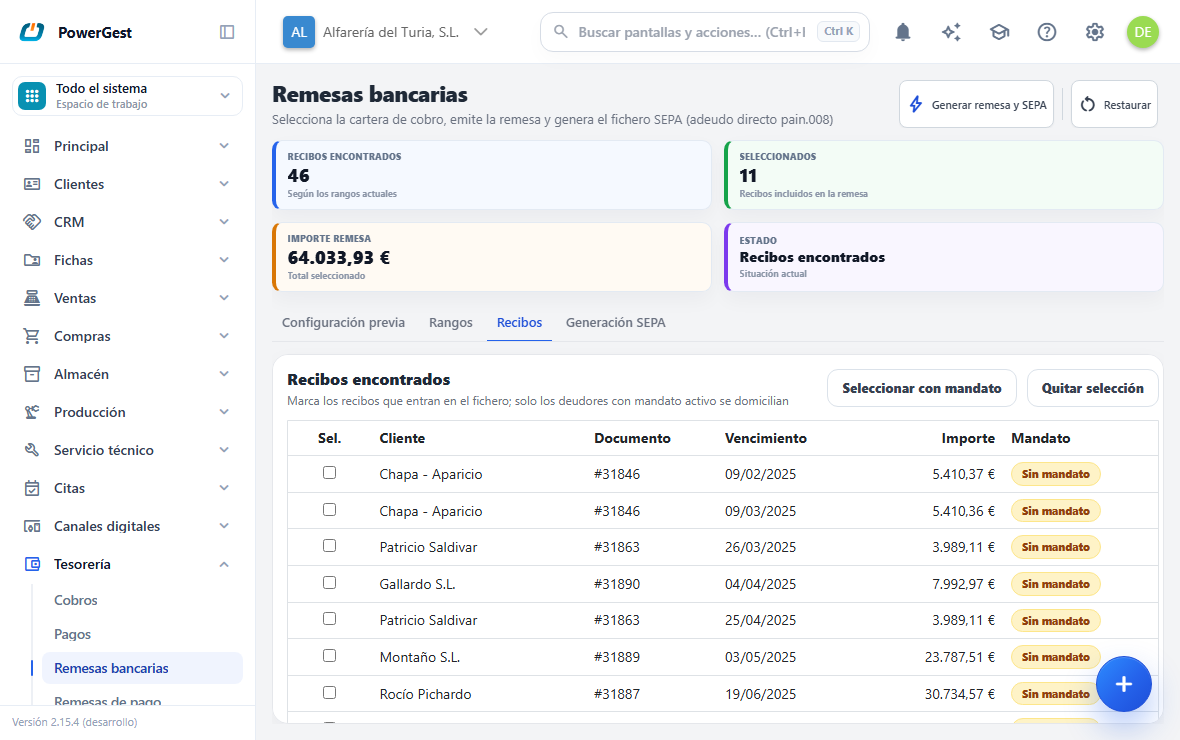
- On opening, the screen has already searched all outstanding bills and shows the Bills tab. To narrow it down, go to the Ranges tab and set Due date from and Due date to or part of the name in Customer contains.
- Click Search bills. The screen goes back to the Bills tab.
- Check the list. Each line shows its status: Active mandate or No mandate for receipts, Valid IBAN or No IBAN for payments.
- The ERP marks only the bills that are ready. You can adjust the selection by hand, or use Select those with a mandate and Clear selection.
- Go to the SEPA generation tab. Type the Issue date, the Collection date (for payments, Payment date) and the Description. You can also change the bank here. The bank doesn’t accept a collection for today or tomorrow: if you set a collection date before the day after tomorrow, the file asks for the collection on the day after tomorrow, as the desktop application suggests. If it falls on a Saturday or Sunday, it moves to Monday.
- Click Generate batch and SEPA.
What is the difference between the issue date and the collection date?
Both start with today’s date. If you leave them the same, the batch has a single date.
| Date | What it is for |
|---|---|
| Issue date | The day you prepare the batch and send it to the bank. It stays on the batch, in the batch list and in its report. It changes nothing else. |
| Collection date (or payment date) | The day the bank collects the bills (or makes the transfers). The journal entry, the bank movement and the charge date the file asks the bank for all go with it. |
For example: you issue today, the 19th, and want the bank to collect on the 27th. Set Issue date 19 and Collection date 27. The journal entry of the collection is dated the 27th.
The issue date cannot be later than the collection date: if it is, the Generate batch and SEPA button is greyed out and the screen tells you why.
What happens when I click Generate batch and SEPA?
Two things, one after the other, and it is worth telling them apart because they can turn out differently.
First the batch is issued: the marked bills become collected or paid, the movement is entered in the treasury account and the journal entry is generated. This is final.
Then the SEPA file is generated and the browser downloads it. Only the business partners that are ready go into the file. A customer with No mandate, or a supplier with No IBAN, is left out of the file even though their bill is inside the batch.
Together with the file comes the batch report: the PDF list of all its bills, ready to print. If you close it, get it again with Print the report, in the header or in the green notice. See it in the batch list takes you to Treasury → Direct debit and payment batches.
If the batch is issued but the file fails, you will see a notice with the reason and the button changes to Retry SEPA file. Correct the missing detail and click it again. No new batch is issued: only the file of the existing batch is retried.
How do I get the file of a batch that has already been issued again?
Go to Treasury → Direct debit and payment batches. The list shows the bank batches issued from 90 days ago on, including those collected later (change the From and To dates to see others, and choose Receipts or Payments). On the batch row click the download icon: the browser downloads the SEPA file of the whole batch again. It helps if the page was closed before downloading it, if it has been lost or if the bank asks for it again.
You can also do it from Receipts (or Payments): mark one bill of that batch and click SEPA file.
How do I print or cancel a batch that has already been issued?
In Treasury → Direct debit and payment batches, on the batch row:
- The print icon opens a PDF with the list of the bills it includes.
- The cancel icon undoes the whole batch, after asking you to confirm: its bills become outstanding again and the batch keeps its number as Cancelled. It only works with Issued batches. If you have already sent the file to the bank, tell them not to load it. If the batch is already reconciled with the statement, it warns you; with Cancel anyway it is cancelled and that bank line goes back to pending reconciliation.
Can I change the date of a batch that has already been issued?
Yes. In Treasury → Direct debit and payment batches, on the batch row, click the calendar icon. Change the Issue date, the Collection date (or Payment date) or both, and click Change the date.
- With the collection date, the collections or payments, the bank movement and the journal entry move to the new date.
- If you only change the issue date, the journal entry is not touched: it is a detail of the batch.
- The batch number does not change.
The batch list shows both dates in its Issue and Collection date (or Payment date) columns. The conditions below are for the collection date:
- It has to be a date in the same year. To move it to another year, cancel it and issue it again.
- If the month of the old or the new date is closed in accounting, nothing changes. Reopen that month first.
- If the batch is reconciled with the statement, it warns you. With Change anyway it is changed and the reconciliation is kept.
- If you have already sent the file to the bank, download it again: the new one has the new date.
Don’t issue the batch again to recover the file: its bills are already collected, they don’t show up to be batched again, and a repeated batch would charge them twice.
Can I look at something else halfway through the batch?
Yes. Go wherever you need —an invoice, a customer’s record— and come back with Back or from the menu: the batch is as you left it, with its account, its ranges and the bills you had marked. When you come back the open items are read again: if someone collected one of your bills in the meantime, it no longer shows, and the rest stay marked.
Until you issue it, the batch is not saved. It is lost if you close the browser tab or click Restore in Treasury → Direct debit batches.
How is it different from the normal receipts screen?
The Receipts screen works with a single customer. You choose the customer, see their complete open items and can apply advance payments, vouchers and partial receipts.
The Direct debit batches screen works with several customers at once. It searches by date range across all the open items, each bill goes in for its total outstanding, and it accepts neither partial receipts nor advance payments nor vouchers. In exchange it produces the SEPA file.
If you only want the file for a single transfer to a supplier, do it from the payment detail with Generate SEPA transfer.
If something goes wrong
| What you see | What has happened | What to do |
|---|---|---|
| ‘The selected account has no IBAN’ | The cash account or bank chosen has no IBAN | Choose another account, or ask for its IBAN to be filled in |
| ‘The creditor company has no SEPA creditor identifier or tax ID’ | The company has no tax ID to derive it from | Fill in the company’s tax ID, or ask for the identifier to be typed in Receipts → SEPA |
| Some bills don’t show up to be batched | They are already in an issued batch | If you are missing the file, get it again with SEPA file from Receipts |
| ‘No debtor in the batch has an active mandate with a valid IBAN’ | No marked customer has a mandate | The batch has been issued; add the mandates and retry the file |
| A customer appears with No mandate | They have no direct debit authorisation | Collect it another way, or process their mandate |
| The Generate batch and SEPA button is greyed out | There are no marked bills, or the account has no IBAN | Check the Bills tab and the Preliminary settings |
| ‘The issue date cannot be later than the collection date’ | You set the issue after the collection | In SEPA generation, set an issue date equal to or earlier than the collection date |
| The batch’s journal entry doesn’t have the issue date | The journal entry always goes with the collection date | That is on purpose: it is the day the bank collects. If you want it on another day, change the collection date |
| A customer doesn’t appear in the file despite having a mandate | Their mandate is managed by an external payment platform | Their bill is charged through that platform, not through the file |
See also: Collect an instalment · Pay a supplier · Return a receipt
More about Payments
- The cash keys
- How do I collect an instalment?
- How do I add a treasury account?
- How do I return a receipt?
- The cash and bank journal
- Collecting and paying with Powergest
- How do I record a payment to a supplier?
- How do I set the payment terms for a customer or a supplier?
- How do I record an advance payment from a customer?
- What is a voucher and how do I use it?